The first question new users have about the aponix vertical system usually is this one: What version would be the ideal one for my use case? Since modularity is the core of the modules there are multiple variations and setups possible. If you plan to buy materials from aponix-DE, the first task would be to define the parts list for your personal application. This will later be the basis for the price/freight cost calculation. This is why we prefer to work with dedicated product partners, who provide more targeted and finished solutions for the different use cases and also cover the marketing, support and sales part independently.
Going through these steps will help you understand the modularity better and figure out your personal setup and parts list more easily. For inspiration you could also take a look at our common bundles.
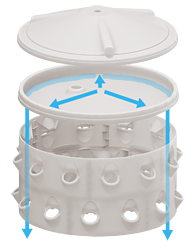
A) How should nutrient solution enter your vertical barrel?
A1) Pressure irrigation
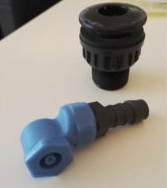
 In larger setups or greenhouses you usually have a pressure line (>1.5 bars/22psi) to feed the liquid coming from the outside of the vertical barrel(s). With our sprinkler dome lid you can mount your own sprinkler or our solutions on top and connect your line from there. Connected sprinklers should have a valve to shut down the barrel or fine tune the amount of liquid. The inverted sprinkler distributes the liquid evenly on the inside surface while the dome lid guides the liquid in a gentle curve to its vertical drip irrigation starting point – which is the first ring segment. We have designed a dedicated Netafim-aponix adapter to make use of Netafim’s irrigation equipment too.
A2) Irrigation without pressure
 If the line delivering the liquid is a no-pressure line like in aquaponics or smaller setups, you will need to use our water buffer part to organize liquid distribution. You can feed it either from the covering top lid from above or using an additional fitting from inside the barrel. Recirculating the liquid within the unit is a common setup for stand alone units which are using a closed base that works as the reservoir in that case with a submersible aquarium pump on a timer for irrigation inside.
B) How would you like to cycle the liquid once it reaches the bottom?
B1) Drain to external reservoir
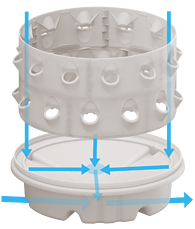 When you are running multiple vertical barrels you should drain the liquid from your barrels and direct it to your own central reservoir. In this case no liquid will remain in any vertical barrel. You can use the multi barrel base or our lid-base to do that. Alternative setups also use the top lid upside down and mount this ‘base’ into a circular cut surface (example). Setting up multiple units in one or multiple rows requires more planning and plumbing. For larger operations there are specialized turnkey planning engineers to do this properly thinking from the production, operations and capital requirements perspectives.
B2) Remain liquid in the base of the unit
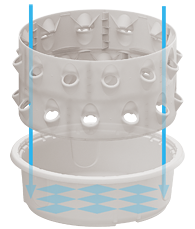 When you plan to run just one or a few vertical barrels, using an external reservoir is not necessary and too complicated. You can use the closed base instead. In that case all the liquid remains in the base and can be recirculated from there using a simple submersible pump.
Alternatively there are 3 flat areas around this base that can be used to build in more logic. One example would be a floating valve that auto-refills when the liquid volume goes below a certain level. This is how TowerGarden is maintaining its liquid nutrients in their standing bases.
C) How many barrel units would you like to run?
C1) One or some standalone units
 You probably like to use a closed base that functions as your reservoir and recirculate the liquid using a commodity no-pressure pump: A2 & B2.
Even if you plan to run >1 units you could still use this setup. Just be aware that you have to maintain as many reservoirs and pumps independently as you run. For larger setups also the weight of the bases might play a role, for example on roof-top installations.
C2) Multiple units
 Here you probably like to drain your liquid from any unit after an irrigation cycle and manage it centrally and protected in a larger tank. You need to think about the liquid volume of that tank, how you want to maintain pH, EC and addition of fresh water and what size your draining pipes need to be when you expect liquid draining from multiple units at the same time. In this case your combination would be like: (A1 OR A2) & B1.
Please also check our integration page for inspiration in this case.
D) What will be the target crop size/shape upon harvest? Organize the plant insert distance on the barrel surface.
D1) Increase the height of a unit by stacking ring segments / levels
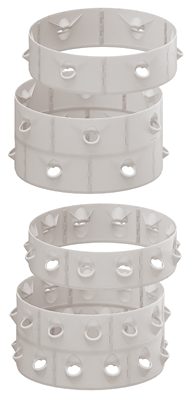 The aponix ring segment elements (V2 and V3) can be clicked together in order to have stackable ring segments or levels. There are different parts in V2 and one universal part in V3 that you can use to configure the position of the grow spaces.
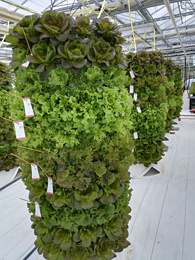
At the highest density you get 12 grow spaces for every level adding 15cm of additional height to a barrel unit. How high you go is flexible. Usually the height of units are planned considering operations, self-shading if you use natural sunlight, microclimate dynamics and more.
D2) Positioning of grow spaces on the barrel surface
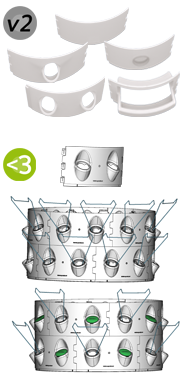 V3: With the newer Version 3 there is only one universal ring segment piece that can be used to arrange grow spaces flexibly on a vertical barrel. Using the cover lids and plant trellis plug pots each ring segment can be stacked with alternating (12 grow space setting) or parallel arrangement (6 grow space setting) of the grow spaces.
V2: The traditional pieces share the same frame but provide differently spaced grow spaces in their surface in the form of multiple different parts: closed piece, a piece with a center grow space and the two-space part.
Any (unused) 5cm grow space (from any version) can be covered using our grow space cover lid. You can use the standard 2″/5cm net pots or use our reusable plug pots that provide also an optional metal trellis insert.
E) Use V3 or V2 parts?
As of 2021 the V3 aponix vertical ring segment part will be the available standard. Manufacturing of V2 ended. V3 was designed by collecting improvements and features from our existing user base between 2017 an 2020. V2 parts might still be available in small numbers and is fine to be used by students, trials and small setups. They require a bit more care and precision while the V3 part has been ‘hardened’ with a lot of functional upgrades. Please take a look at our V2/V3 in the compatibility section of our soilless page for more details if you already own or use V2.
A few more options and solutions to start your own ideas / There is also the pragmatic aponix user group on facebook!
The pragmatic gardener should be able to see beyond the actual system and think in larger solutions.
 Using an inverted sprinkler operating at a pressure of >=1.5bar liquid is sprayed evenly in 360 degrees to the inside walls of the barrel. The two net pot insert 1/6 part has an inner wing structure to then distribute the liquid flowing down the inside to each root zone of your plants.
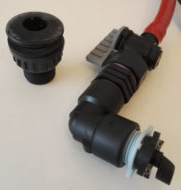
The flow rate of this standard irrigation method should be 2 liters per minute. Please note: It requires fine-tuning at the valve to 2l to max 5l/min! If you run much too much water through the sprinkler, you will probably end up with unhappy plants and water pushing out from your barrel over time. Another option is our Netafim-aponix adapter. That way you can use the Netafim micro spray tubing and nozzles.
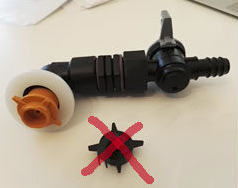
 Using a spray nozzle operating from a pressure of +3 bars. These spray nozzles are self cleaning for smaller particles and spray a hollow cone shape of 120 degrees from the top lid – basically the same shape as the top lid itself, filling your barrel up with a fine drizzle. The flow rate of this more aeroponic irrigation method is 1.5 liters per minute.
 Another irrigation option for multiple barrels with low-tech pump (low pressure) can be a combination of the irrigation buffer from above plus a modified sprinkler on a top lid.
 For low tech irrigation (open hose) with much simpler impeller pumps or just pouring a bucket on top you can use our top water buffer. Please check out the properties on our product page. This part is put between the top ring segment of a barrel and the covering top lid. It has its own irrigation holes and overflow to protect you from over filling the buffer. This is the most simple irrigation option. It can a) be filled from inside a vertical barrel with the black fitting in the center (see standalone vertical barrel) on the image…
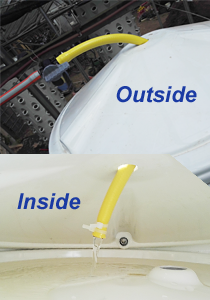 .. OR b) without the center hole from the outside through the top lid into the water buffer if you are using multiple vertical barrels but do not want to use the sprinkler requiring a pressured line.
Since the concept of the barrel is just to provide a flexible corpus to grow plants at high density, you could well integrate your own irrigation idea. Lids and bases can also be equipped with custom holes and fittings. But you can also integrate your own – like fogging or anything else that might suit your crop.